Jewelry Photography – 10 Tips for Taking Beautiful Photographs of Your Jewelry

Whether you’re wearing your jewelry or trying to sell it, you’ll want your jewelry photographs to be beautiful and to show your jewelry in its best light, but photographing jewelry isn’t as easy as one would think it would be. However, neither is it all that complicated; there are techniques you can follow for taking fabulous photos of jewelry. We’ve listed some of them below.
- Clean and polish. Easily forgotten, but very important to beautiful jewelry photography, is cleaning and polishing your jewelry piece. The camera, for better or for worse, picks up on details that the naked eye misses, including dust, fingerprints, grit, etc. To showcase your jewelry in the best possible way, make sure it’s properly cleaned and polished (feel free to read our tips for cleaning and polishing your jewelry). In fact, we suggest lightly wiping your jewelry every time you touch it to avoid fingerprints and other smudges. You might even want to wear a pair of cotton gloves when handling your jewelry.
- Use the right lens. Specifically, use a macro lens, so you can take up-close photos that reveal all the glorious details of your jewelry. A standard lens won’t capture the minute details and complexities of your jewelry that a macro lens can capture. While these lenses don’t come cheap, if you want excellent photos, you’ll need one.
- Don’t over do the background. The background should complement, not detract from the jewelry. Avoid colorful and active backgrounds. Rather, keep it simple, but put thought into it so that you find a background that flatters and enhances the jewelry piece. For example, an engagement ring might look lovely with a single rose placed next to it, a graduation ring could look great next to a graduation cap, or a Mother’s Day pendant could be photographed with a heart in the background.
- Keep your camera stable. Use a tripod or place the camera on a stable surface for sharper images and to avoid camera shake. Remember that taking pictures of smaller objects like jewelry means that any minor hand movements while holding the camera will show up in the photo and diminish clarity and distinction.
- Make sure your focus is precise. A precise focus is especially important for close-ups where auto-focus may not always work optimally. The objective of jewelry photography is to capture all the fine design details and poor focus shots (usually caused by setting the camera aperture too low) won’t provide the kind of sharp image you’re aiming to achieve. To achieve the best results, you’re better off manually setting the aperture and ISO of your camera.
- Get your white balance correct. White balance allows you to control how colors are captured in different lights and it can be controlled by a setting on your camera. When you have the white balance adjusted correctly, your jewelry images will appear more natural.
- Lighting. Create soft and even lighting to eliminate as much shadow as possible. The key to getting great results is to control the light you’ll need to illuminate your subjects, and the simplest way to control it is to confine the photograph area to a small space. Light tents are great for this. They can soften and diffuse the light and provide consistent results.
- Don’t forget about reflections. It’s difficult to photograph highly reflective objects without also capturing reflections – reflections that can leave people viewing the photo wondering about what they’re actually seeing. Gemstones and metals are highly reflective, which is one of the reasons that jewelry photography can be so challenging. It’s also the reason why you’re likely to find yourself (and your camera) reflected in the jewelry (obviously not something you want) unless you learn how to properly photograph reflective images. If you’re not sure, there are plenty of helpful guides to be found that can explain how.
- Positioning. Pay attention to how you position your jewelry. At which angle does it look best? Do you want a single piece, two pieces, a set? For example, a pair of earrings should be positioned to face each other, not away from each other. Smaller pieces of jewelry like small charms or pendants should be propped up so they sit upright and can be easily viewed. Just make sure the prop isn’t seen in the photo. Many professional photographers use prop wax, which supports the jewelry piece, but won’t be visible in the photo.
- Wearing the jewelry for the photo. If you want to take photos of you or someone wearing the jewelry, keep in mind that the person that is modeling the jewelry as well as the clothes worn, should not distract from the jewelry itself. Clothing should be solid and makeup should be minimal. Also, you can use only parts of the body, the hand, the neckline, the wrist etc.
Last, a word about renders
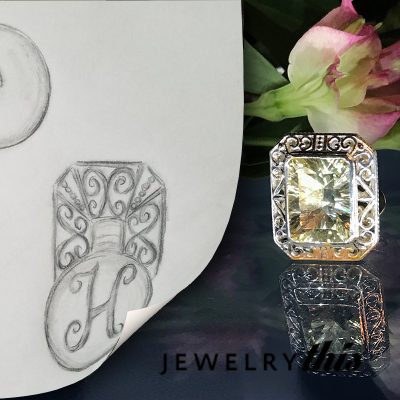
Jewelry renders are another easy and inexpensive way to showcase your jewelry pieces. Photo-realistic renders are not photos of actual pieces. On the contrary, renders, unlike photographs of jewelry, which are images of already created jewelry pieces, are images of a jewelry piece to be. Renders can be created without even having to cast and mold the jewelry design. Indeed, renders are one of the many benefits of CAD jewelry design as CAD designers can show their customers renders of the design, which allows them to easily visualize the final jewelry piece even before it’s produced.
(For more on renders, feel free to read this brief article ‘Rendering for 3D Jewelry Design’). With really professional renders, it’s almost impossible to tell the difference between a render and a photograph. Can you tell which image below is a render and which is a photograph? Write your answer in the comments. And check back for the answer!
-

- Real or render?

-

- Real or render?